Svolence


  • Home

  • Categories

  • About

  • Archives

  • Tags
Svolence

centos sendmail

Posted on  |  2017-11-15   |   In sendmail   |     |   Visitors

centos sendmail配置

安装

1
2
3
4
5
6
yum install -y sendmail
yum install -y sendmail-cf
[root@vmlin5282 mail]# rpm -qa | grep sendmail
sendmail-cf-8.14.4-9.el6_8.1.noarch
sendmail-8.14.4-9.el6_8.1.x86_64

配置

1)
备份配置文件

1
2
3
cp /etc/mail/sendmail.mc /etc/mail/sendmail.mc.bak
cp /etc/mail/sendmail.cf /etc/mail/sendmail.cf.bak

2)

1
vim /etc/mail/sendmail.mc

默认监听本机,这里需要注释掉,添加dnl

1
dnl DAEMON_OPTIONS(`Port=smtp,Addr=127.0.0.1, Name=MTA')dnl

Sendmail服务的网络访问权限,如果仅仅是本机使用,就不用配置,如果是允许外部机器访问,可以进行限制

将127.0.0.1改为0.0.0.0或者注释掉,意思是任何主机都可以访问Sendmail服务。如果仅让某一个网段能够访问到Sendmail服务,将127.0.0.1改为形如192.168.1.0/24的一个特定网段地址

3)
信息伪装(可选配置,可在PHPMailer中代码中自定义)

1
2
3
4
5
6
7
8
9
10
11
12
13
14
//此句去掉注释,修改为:MASQUERADE_AS('yourdomain.com')dnl
dnl MASQUERADE_AS('mydomain.com')dnl //是否对信息作伪装
//去掉注释
dnl FEATURE(masquerade_envelope)dnl //是否对整个域(包括子域)做伪装
//去掉注释
dnl FEATURE(masquerade_entire_domain)dnl
//去掉注释
dnl MASQUERADE_DOMAIN(localhost)dnl //对localhost域做伪装
//去掉注释
dnl MASQUERADE_DOMAIN(localhost.localdomain)dnl //将locahost.com域伪装成yourdomain.com

4)
开启SMTPAuth认证

1
2
3
dnl TRUST_AUTH_MECH(`EXTERNAL DIGEST-MD5 CRAM-MD5 LOGIN PLAIN')dnl
dnl define(`confAUTH_MECHANISMS', `EXTERNAL GSSAPI DIGEST-MD5 CRAM-MD5 LOGIN PLAIN')dnl

将其改为如下

1
2
3
TRUST_AUTH_MECH(`EXTERNAL DIGEST-MD5 CRAM-MD5 LOGIN PLAIN')dnl
define(`confAUTH_MECHANISMS', `EXTERNAL GSSAPI DIGEST-MD5 CRAM-MD5 LOGIN PLAIN')dnl

TRUST_AUTH_MECH的作用是使sendmail不管access文件中如何设置,都能relay那些通过EXTERNAL, LOGIN, PLAIN, CRAM-MD5或DIGEST-MD5等方式验证的邮件,注意这里是对需要relay的邮件进行验证,只有这样通过验证的邮件才会被relay以防止sendmail服务器被滥用。

confAUTH_MECHANISMS的作用是确定系统的认证方式

Read more »
Svolence

kong introduce

Posted on  |  2017-06-15   |   In kong   |     |   Visitors

Kong 初探(一)

Kong 安装

  • 可参照官网https://getkong.org进行有选择性的安装
1
2
3
4
5
wget https://github.com/Mashape/kong/releases/download/0.10.3/kong-0.10.3.trusty_all.deb
sudo apt-get update
sudo apt-get install openssl libpcre3 procps perl
sudo dpkg -i kong-0.10.3.trusty_all.deb
  • Kong 支持两种数据库postgres 和 cassandra,默认postgres

安装postgresql

  • 添加postgresql源:
1
2
3
4
5
sudo touch /etc/apt/sources.list.d/pgdb.list
sudo vim /etc/apt/sources.list.d/pgdb.list
# 把下面这行数据添加到pgdb.list文件中:
deb https://apt.postgresql.org/pub/repos/apt/ trusty-pgdg main
  • 执行下面的命令添加postgresql安装包的秘钥:
1
2
3
4
5
6
7
sudo wget --quiet -O - https://postgresql.org/media/keys/ACCC4CF8.asc | sudo apt-key add -
sudo apt-get update
sudo apt-get install postgresql-9.6
# 重启 postgresql
sudo service postgresql restart

Kong 数据库配置

  • 创建用户、数据库
1
2
3
4
5
6
7
8
9
10
11
12
➜ wenyue sudo -i -u postgres
postgres@vmlin0310:~$ CREATE USER kong; CREATE DATABASE kong OWNER kong;
CREATE: command not found
postgres@vmlin0310:~$ psql
psql (9.6.3)
Type "help" for help.
postgres=# CREATE USER kong; CREATE DATABASE kong OWNER kong;
CREATE ROLE
CREATE DATABASE
postgres=#
  • 修改密码
1
2
3
4
5
6
7
8
9
10
11
12
➜ wenyue sudo su postgres
postgres@vmlin0310:/home/wenyue$ psql
psql (9.6.3)
Type "help" for help.
postgres=# \password kong
Enter new password:
Enter it again:
postgres=# exit
postgres-# \q
postgres@vmlin0310:/home/wenyue$ exit
exit
  • 验证
1
2
3
4
5
6
7
8
9
10
11
12
13
14
15
16
17
18
19
➜ wenyue psql -U kong -d kong -h 127.0.0.1
Password for user kong:
psql (9.6.3)
SSL connection (protocol: TLSv1.2, cipher: ECDHE-RSA-AES256-GCM-SHA384, bits: 256, compression: off)
Type "help" for help.
kong=> \l
List of databases
Name | Owner | Encoding | Collate | Ctype | Access privileges
-----------+----------+----------+-------------+-------------+-----------------------
kong | kong | UTF8 | en_US.UTF-8 | en_US.UTF-8 |
postgres | postgres | UTF8 | en_US.UTF-8 | en_US.UTF-8 |
template0 | postgres | UTF8 | en_US.UTF-8 | en_US.UTF-8 | =c/postgres +
| | | | | postgres=CTc/postgres
template1 | postgres | UTF8 | en_US.UTF-8 | en_US.UTF-8 | =c/postgres +
| | | | | postgres=CTc/postgres
(4 rows)
kong=>
Read more »
Svolence

Gitlab PostgreSQL Migration MySQL

Posted on  |  2017-03-03   |   In gitlab   |     |   Visitors

Gitlab PostgreSQL Migration MySQL


1. Packages / Dependencies

1
2
sudo apt-get update
sudo apt-get upgrade

During this installation some files will need to be edited manually. If you are familiar with vim set it as default editor with the commands below. If you are not familiar with vim please skip this and keep using the default editor.

1
2
3
# Install vim and set as default editor
sudo apt-get install vim
sudo update-alternatives --set editor /usr/bin/vim.basic

Install the required packages (needed to compile Ruby and native extensions to Ruby gems):

1
sudo apt-get install build-essential zlib1g-dev libyaml-dev libssl-dev libgdbm-dev libreadline-dev libncurses5-dev libffi-dev curl openssh-server checkinstall libxml2-dev libxslt-dev libcurl4-openssl-dev libicu-dev logrotate python-docutils pkg-config cmake

Make sure you have the right version of Git installed

1
2
3
4
5
# Install Git
sudo apt-get install git
# Make sure Git is version 2.8.4 or higher
git --version

In order to receive mail notifications, make sure to install a mail server. By default, Debian is shipped with exim4 but this has problems while Ubuntu does not ship with one. The recommended mail server is postfix and you can install it with

1
sudo apt-get install postfix

Then select ‘Internet Site’ and press enter to confirm the hostname

2. Ruby

The current supported Ruby versions are 2.1.x and 2.3.x. 2.3.x is preferred, and support for 2.1.x will be dropped in the future.

The use of Ruby version managers such as RVM, rbenv or chruby with GitLab in production, frequently leads to hard to diagnose problems. For example, GitLab Shell is called from OpenSSH, and having a version manager can prevent pushing and pulling over SSH. Version managers are not supported and we strongly advise everyone to follow the instructions below to use a system Ruby.

Remove the old Ruby 1.8 if present:

1
sudo apt-get remove ruby1.8

Download Ruby and compile it:

1
2
3
4
5
6
7
mkdir /tmp/ruby && cd /tmp/ruby
curl --remote-name --progress https://cache.ruby-lang.org/pub/ruby/x.x.x/ruby-x.x.x.tar.gz
tar xzf ruby-x.x.x.tar.gz
cd ruby-x.x.x
./configure --disable-install-rdoc
make
sudo make install

Install the Bundler Gem:

1
sudo gem install bundler --no-ri --no-rdoc

3. Go

Since GitLab 8.0, Git HTTP requests are handled by gitlab-workhorse (formerly gitlab-git-http-server). This is a small daemon written in Go. To install gitlab-workhorse we need a Go compiler. The instructions below assume you use 64-bit Linux. You can find downloads for other platforms at the Go download page.

1
2
3
4
5
6
7
8
# Remove former Go installation folder
sudo rm -rf /usr/local/go
curl --remote-name --progress https://storage.googleapis.com/golang/go1.x.x.linux-amd64.tar.gz
sudo tar -C /usr/local -xzf go1.x.x.linux-amd64.tar.gz
sudo ln -sf /usr/local/go/bin/{go,godoc,gofmt} /usr/local/bin/
rm go1.x.3.linux-amd64.tar.gz
Read more »
Svolence

Telegraf+Influxdb+Grafana (2)

Posted on  |  2016-12-09   |   In influxdb   |     |   Visitors

datasource & dashboards config

  • 访问http://localhost:3000 Grafana控制面板

初始化界面

  • 确保已经添加数据源(可以通过上一节中Telegraf采集本机数据入influxdb)

    点击左上角Grafana图标->Data Sources如下:

    add datasource

    add datasource

    edit datasource

  • 点击图中位置1可以新建一个dashboard

add databoards

或者导入一个json格式的文件

edit databoards

  • 下图是我本机的数据,通过位置3可以添加选项,位置4编辑dashborad,位置5添加Row

edit databoards

  • 选择数据库,添加查询语句

add sql

  • Alert config

alert config

  • add email

add email

  • config notifications

config

config

config

TroubleShooting

测试邮件发送的时候未接受到邮件,查看日志tail -f /var/log/grafana发现:

t=2016-12-08T11:26:21+0800 lvl=eror msg=”Failed to send alert notification

email” logger=alerting.notifier.email error=”Grafana mailing/smtp options not configured, contact your Grafana admin”

t=2016-12-08T14:05:50+0800 lvl=eror msg=”Failed to send alert notification

email” logger=alerting.notifier.email error=”gomail: could not send email 1: 503 Error: need EHLO and AUTH first !”

需要开启smtp以及正确配置

1
2
3
4
5
6
7
8
9
10
11
12
13
# vi /etc/grafana/grafana.ini
[smtp]
enabled = true
;host = localhost:25
user = 系统邮箱账户(admin@qq.com)
password = 系统邮箱密码(admin)
host = smtp.exmail.qq.com:465
//因为我在本地vbox虚拟机中测试的,所以这里用的是腾讯企业邮箱的服务器,对应上面的user和pass就是我自己的邮箱和密码
;cert_file =
;key_file =
;skip_verify = false
from_address = admin@qq.com

收到的邮件类似这样

success

参考链接:

  • http://docs.grafana.org/
Svolence

Telegraf+Influxdb+Grafana (1)

Posted on  |  2016-12-09   |   In influxdb   |     |   Visitors

Telegraf+InfluxDB+Grafana初探

1.Configuration information

  • system info

    1
    unbuntu 16.04 x86_64
  • InfluxDB v1.1.1 install

    1
    2
    wget https://dl.influxdata.com/influxdb/releases/influxdb_1.1.1_amd64.deb
    sudo dpkg -i influxdb_1.1.1_amd64.deb
  • Telegraf v1.1.1 install

    1
    2
    wget https://dl.influxdata.com/telegraf/releases/telegraf_1.1.1_amd64.deb
    sudo dpkg -i telegraf_1.1.1_amd64.deb
  • Chronograf v1.1.0~beta1 install

    1
    2
    wget https://dl.influxdata.com/chronograf/releases/chronograf_1.1.0~beta1_amd64.deb
    sudo dpkg -i chronograf_1.1.0~beta1_amd64.deb
  • Kapacitor v1.1.1 install

    1
    2
    wget https://dl.influxdata.com/kapacitor/releases/kapacitor_1.1.1_amd64.deb
    sudo dpkg -i kapacitor_1.1.1_amd64.deb
  • grafana_4.0.1 install

    1
    2
    3
    wget https://grafanarel.s3.amazonaws.com/builds/grafana_4.0.1-1480694114_amd64.deb
    sudo apt-get install -y adduser libfontconfig
    sudo dpkg -i grafana_4.0.1-1480694114_amd64.deb

2.Telegraf 抓取本机信息

  • 自动生成telegraf.conf
    1
    telegraf config > telegraf.conf

Note: Telegraf will start automatically using the default configuration when installed from a deb package.

通过deb安装的话,Telegraf默认启动的配置文件在/etc/telegraf/telegraf.conf

手动生成一个简单的配置

1
2
3
4
5
6
7
8
9
10
11
12
13
14
15
16
17
18
19
20
21
telegraf -sample-config -input-filter cpu:mem -output-filter influxdb > telegraf.conf
root@test:/etc/telegraf# cat test.conf
[agent]
interval = "1s"
[outputs]
# Configuration to send data to InfluxDB.
[outputs.influxdb]
urls = ["http://localhost:8086"]
database = "kapacitor_example"
user_agent = "telegraf"
# Collect metrics about cpu usage
[cpu]
percpu = false
totalcpu = true
drop = ["cpu_time"]
root@test:/etc/telegraf#

InfluxDB中查看抓取信息

1
2
3
4
5
6
7
8
9
10
11
12
13
14
15
16
17
18
19
20
21
22
23
24
25
26
27
28
29
root@test:/etc/telegraf# influx
Visit https://enterprise.influxdata.com to register for updates, InfluxDB server management, and monitoring.
Connected to http://localhost:8086 version 1.1.0
InfluxDB shell version: 1.1.0
> show databases;
name: databases
name
----
telegraf
_internal
kapacitor_example
test_log
error_log
> use telegraf
Using database telegraf
> show measurements;
name: measurements
name
----
cpu
disk
diskio
kernel
mem
processes
swap
system
>

To enable the Admin UI, edit the configuration file to set enabled = true in the [admin] section.
You must restart the process for any configuration changes to take effect.

Once enabled, the Admin UI is available by default at port 8083, i.e. http://localhost:8083.
You can control the port in the InfluxDB config file using the port option in the [admin] section.

InfluxDB v1.1之前默认开启后台管理界面,直接访问:http://localhost:8083,新的版本默认关闭,开启的话需要在
/etc/influxdb/influxdb.conf下[admin]选项下开启

3.Chronograf 可视化展示

1
influxd # 启动influxdb

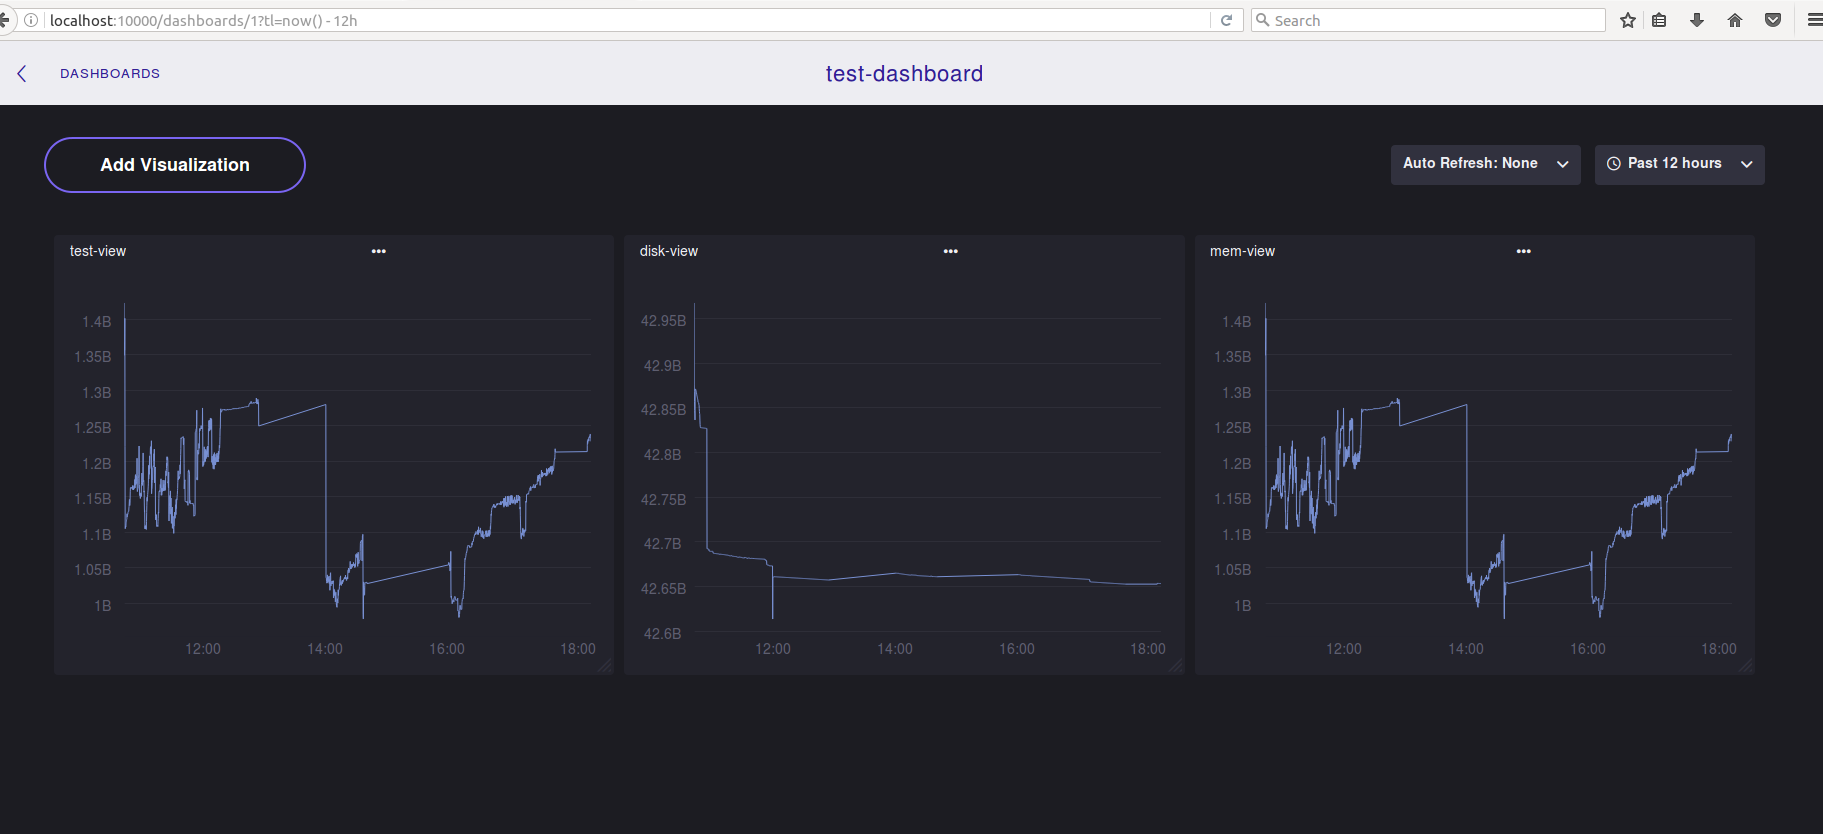
访问http://localhost:10000,会看到如下界面
可视化界面

参考链接:

  • https://docs.influxdata.com/
123
Svolence

Svolence

Talk is cheap, show me the code!!!

15 posts
9 categories
16 tags
© 2017 Svolence
Powered by Hexo
Theme - NexT.Mist