Svolence

Gitlab PostgreSQL Migration MySQL

Gitlab PostgreSQL Migration MySQL


1. Packages / Dependencies

1
2
sudo apt-get update
sudo apt-get upgrade

During this installation some files will need to be edited manually. If you are familiar with vim set it as default editor with the commands below. If you are not familiar with vim please skip this and keep using the default editor.

1
2
3
# Install vim and set as default editor
sudo apt-get install vim
sudo update-alternatives --set editor /usr/bin/vim.basic

Install the required packages (needed to compile Ruby and native extensions to Ruby gems):

1
sudo apt-get install build-essential zlib1g-dev libyaml-dev libssl-dev libgdbm-dev libreadline-dev libncurses5-dev libffi-dev curl openssh-server checkinstall libxml2-dev libxslt-dev libcurl4-openssl-dev libicu-dev logrotate python-docutils pkg-config cmake

Make sure you have the right version of Git installed

1
2
3
4
5
# Install Git
sudo apt-get install git
# Make sure Git is version 2.8.4 or higher
git --version

In order to receive mail notifications, make sure to install a mail server. By default, Debian is shipped with exim4 but this has problems while Ubuntu does not ship with one. The recommended mail server is postfix and you can install it with

1
sudo apt-get install postfix

Then select ‘Internet Site’ and press enter to confirm the hostname

2. Ruby

The current supported Ruby versions are 2.1.x and 2.3.x. 2.3.x is preferred, and support for 2.1.x will be dropped in the future.

The use of Ruby version managers such as RVM, rbenv or chruby with GitLab in production, frequently leads to hard to diagnose problems. For example, GitLab Shell is called from OpenSSH, and having a version manager can prevent pushing and pulling over SSH. Version managers are not supported and we strongly advise everyone to follow the instructions below to use a system Ruby.

Remove the old Ruby 1.8 if present:

1
sudo apt-get remove ruby1.8

Download Ruby and compile it:

1
2
3
4
5
6
7
mkdir /tmp/ruby && cd /tmp/ruby
curl --remote-name --progress https://cache.ruby-lang.org/pub/ruby/x.x.x/ruby-x.x.x.tar.gz
tar xzf ruby-x.x.x.tar.gz
cd ruby-x.x.x
./configure --disable-install-rdoc
make
sudo make install

Install the Bundler Gem:

1
sudo gem install bundler --no-ri --no-rdoc

3. Go

Since GitLab 8.0, Git HTTP requests are handled by gitlab-workhorse (formerly gitlab-git-http-server). This is a small daemon written in Go. To install gitlab-workhorse we need a Go compiler. The instructions below assume you use 64-bit Linux. You can find downloads for other platforms at the Go download page.

1
2
3
4
5
6
7
8
# Remove former Go installation folder
sudo rm -rf /usr/local/go
curl --remote-name --progress https://storage.googleapis.com/golang/go1.x.x.linux-amd64.tar.gz
sudo tar -C /usr/local -xzf go1.x.x.linux-amd64.tar.gz
sudo ln -sf /usr/local/go/bin/{go,godoc,gofmt} /usr/local/bin/
rm go1.x.3.linux-amd64.tar.gz

4. Node

Since GitLab 8.17, GitLab requires the use of node >= v4.3.0 to compile javascript assets, and starting in GitLab 9.0, yarn >= v0.17.0 is required to manage javascript dependencies. In many distros the versions provided by the official package repositories are out of date, so we’ll need to install through the following commands:

1
2
3
4
5
6
# install node v7.x
curl --location https://deb.nodesource.com/setup_7.x | bash -
sudo apt-get install nodejs
# install yarn
curl --location https://yarnpkg.com/install.sh | bash -

5. System Users

Create a git user for GitLab:

1
sudo adduser --disabled-login --gecos 'GitLab' git

6. Database

Initial database setup

1
2
3
4
5
6
7
8
9
10
11
12
13
14
15
16
17
18
19
20
21
22
23
24
25
26
27
28
29
30
31
32
33
34
35
36
37
38
39
40
41
42
43
44
45
46
47
# Install the database packages
sudo apt-get install -y mysql-server mysql-client libmysqlclient-dev
# Ensure you have MySQL version 5.5.14 or later
mysql --version
# Pick a MySQL root password (can be anything), type it and press enter
# Retype the MySQL root password and press enter
# Secure your installation
sudo mysql_secure_installation
# Login to MySQL
mysql -u root -p
# Type the MySQL root password
# Create a user for GitLab
# do not type the 'mysql>', this is part of the prompt
# change $password in the command below to a real password you pick
mysql> CREATE USER 'git'@'localhost' IDENTIFIED BY '$password';
# Ensure you can use the InnoDB engine which is necessary to support long indexes
# If this fails, check your MySQL config files (e.g. `/etc/mysql/*.cnf`, `/etc/mysql/conf.d/*`) for the setting "innodb = off"
mysql> SET storage_engine=INNODB;
# If you have MySQL < 5.7.7 and want to enable utf8mb4 character set support with your GitLab install, you must set the following NOW:
mysql> SET GLOBAL innodb_file_per_table=1, innodb_file_format=Barracuda, innodb_large_prefix=1;
# Create the GitLab production database
mysql> CREATE DATABASE IF NOT EXISTS `gitlabhq_production` DEFAULT CHARACTER SET `utf8` COLLATE `utf8_general_ci`;
# Grant the GitLab user necessary permissions on the database
mysql> GRANT SELECT, INSERT, UPDATE, DELETE, CREATE, CREATE TEMPORARY TABLES, DROP, INDEX, ALTER, LOCK TABLES, REFERENCES ON `gitlabhq_production`.* TO 'git'@'localhost';
# Quit the database session
mysql> \q
# Try connecting to the new database with the new user
sudo -u git -H mysql -u git -p -D gitlabhq_production
# Type the password you replaced $password with earlier
# You should now see a 'mysql>' prompt
# Quit the database session
mysql> \q

You are done installing the database for now and can go back to the rest of the installation. Please proceed to the rest of the installation before running through the utf8mb4 support section


MySQL utf8mb4 support

After installation or upgrade, remember to convert any new tables to utf8mb4/utf8mb4_general_ci


We are about to do the following:

  • Ensure you can enable utf8mb4 encoding and utf8mb4_general_ci collation for your GitLab DB, tables and data
  • Convert your GitLab tables and data from utf8/utf8_general_ci to utf8mb4/utf8mb4_general_ci

Check for utf8mb4 support


Check for InnoDB File-Per-Table Tablespaces


We need to check, enable and maybe convert your existing GitLab DB tables to the InnoDB File-Per-Table Tablespaces as a prerequise for supporting utfb8mb4 with long indexes required by recent GitLab databases

1
2
3
4
5
6
7
8
9
10
11
12
13
14
15
16
17
18
19
20
21
22
23
24
25
26
27
28
29
30
31
32
# Login to MySQL
mysql -u root -p
# Type the MySQL root password
mysql > use gitlabhq_production;
# Check your MySQL version is >= 5.5.3 (GitLab requires 5.5.14+)
mysql > SHOW VARIABLES LIKE 'version';
+---------------+-----------------+
| Variable_name | Value |
+---------------+-----------------+
| version | 5.5.53-0+deb8u1 |
+---------------+-----------------+
# Note where is your MySQL data dir for later:
mysql > select @@datadir;
+----------------+
| @@datadir |
+----------------+
| /var/lib/mysql |
+----------------+
# Note whether your MySQL server runs with innodb_file_per_table ON or OFF:
mysql> SELECT @@innodb_file_per_table;
+-------------------------+
| @@innodb_file_per_table |
+-------------------------+
| 1 |
+-------------------------+
# You can now quit the database session
mysql> \q

You need MySQL 5.5.3 or later to perform this update

Whatever the results of your checks above, we now need to check if your GitLab database has been created using InnoDB File-Per-Table Tablespaces (i.e. innodb_file_per_table was set to 1 at initial setup time)

Note: This setting is enabled by default since MySQL 5.6.6.

1
2
3
4
5
# Run this command with root privileges, replace the data dir if different:
sudo ls -lh /var/lib/mysql/gitlabhq_production/*.ibd | wc -l
# Run this command with root privileges, replace the data dir if different:
sudo ls -lh /var/lib/mysql/gitlabhq_production/*.frm | wc -l
  • Case 1: a result > 0 for both commands

Congrats, your GitLab database uses the right InnoDB tablespace format.

However, you must still ensure that any future tables created by GitLab will still use the right format:

  • If SELECT @@innodb_file_per_table returned 1 previously, your server is running correctly

    It’s however a requirement to check now that this setting is indeed persisted in your my.cnf file!

  • If SELECT @@innodb_file_per_table returned 0 previously, your server is not running correctly

Enable innodb_file_per_table by running in a MySQL session as root the command SET GLOBAL innodb_file_per_table=1, innodb_file_format=Barracuda;and persist the two settings in your my.cnf file

Now, if you have a different result returned by the 2 commands above, it means you have a mix of tables format uses in your GitLab database. This can happen if your MySQL server had different values for innodb_file_per_table in its life and you updated GitLab at different moments with those inconsistent values. So keep reading.

  • Case 2: a result equals to “0” OR not the same result for both commands

Unfortunately, none or only some of your GitLab database tables use the GitLab requirement of InnoDB File-Per-Table Tablespaces

1
2
3
4
5
6
7
8
9
10
# Login to MySQL
mysql -u root -p
# Type the MySQL root password
# Enable innodb_file_per_table and set innodb_file_format on the running server:
mysql > SET GLOBAL innodb_file_per_table=1, innodb_file_format=Barracuda;
# You can now quit the database session
mysql> \q

Now, persist innodb_file_per_table and innodb_file_format in your my.cnf file

Ensure at this stage that your GitLab instance is indeed stopped.
Now, let’s convert all the GitLab database tables to the new tablespace format:

1
2
3
4
5
6
7
8
9
10
11
12
13
14
15
16
17
18
19
20
# Login to MySQL
mysql -u root -p
# Type the MySQL root password
mysql > use gitlabhq_production;
# Safety check: you should still have those values set as follow:
mysql> SELECT @@innodb_file_per_table, @@innodb_file_format;
+-------------------------+----------------------+
| @@innodb_file_per_table | @@innodb_file_format |
+-------------------------+----------------------+
| 1 | Barracuda |
+-------------------------+----------------------+
mysql > SELECT CONCAT('ALTER TABLE `', TABLE_NAME,'` ENGINE=InnoDB;') AS 'Copy & run these SQL statements:' FROM INFORMATION_SCHEMA.TABLES WHERE TABLE_SCHEMA="gitlabhq_production" AND TABLE_TYPE="BASE TABLE";
# If previous query returned results, copy & run all shown SQL statements
# You can now quit the database session
mysql> \q

Check for proper InnoDB File Format, Row Format, Large Prefix and tables conversion


We need to check, enable and probably convert your existing GitLab DB tables to use the Barracuda InnoDB file format, the DYNAMIC row format and innodb_large_prefix as a second prerequisite for supporting utfb8mb4 with long indexes used by recent GitLab databases

1
2
3
4
5
6
7
8
9
10
11
12
13
14
15
16
17
18
19
20
21
22
23
# Login to MySQL
mysql -u root -p
# Type the MySQL root password
mysql > use gitlabhq_production;
# Set innodb_file_format and innodb_large_prefix on the running server:
# Note: These are the default settings only for MySQL 5.7.7 and later.
mysql > SET GLOBAL innodb_file_format=Barracuda, innodb_large_prefix=1;
# Your DB must be (still) using utf8/utf8_general_ci as default encoding and collation.
# We will NOT change the default encoding and collation on the DB in order to support future GitLab migrations creating tables
# that require "long indexes support" on installations using MySQL <= 5.7.9.
# However, when such migrations occur, you will have to follow this guide again to convert the newly created tables to the proper encoding/collation.
# This should return the following:
mysql> SELECT @@character_set_database, @@collation_database;
+--------------------------+----------------------+
| @@character_set_database | @@collation_database |
+--------------------------+----------------------+
| utf8 | utf8_general_ci |
+--------------------------+----------------------+

Now, ensure that innodb_file_format and innodb_large_prefix are persisted in your my.cnf file

Tables and data conversion to utf8mb4

Now that you have a persistent MySQL setup, you can safely upgrade tables after setup or upgrade time:

1
2
3
4
5
6
7
8
9
10
11
12
13
14
15
16
17
18
19
# Convert tables not using ROW_FORMAT DYNAMIC:
mysql> SELECT CONCAT('ALTER TABLE `', TABLE_NAME,'` ROW_FORMAT=DYNAMIC;') AS 'Copy & run these SQL statements:' FROM INFORMATION_SCHEMA.TABLES WHERE TABLE_SCHEMA="gitlabhq_production" AND TABLE_TYPE="BASE TABLE" AND ROW_FORMAT!="Dynamic";
# !! If previous query returned results, copy & run all shown SQL statements
# Convert tables/columns not using utf8mb4/utf8mb4_general_ci as encoding/collation:
mysql > SET foreign_key_checks = 0;
mysql > SELECT CONCAT('ALTER TABLE `', TABLE_NAME,'` CONVERT TO CHARACTER SET utf8mb4 COLLATE utf8mb4_general_ci;') AS 'Copy & run these SQL statements:' FROM INFORMATION_SCHEMA.TABLES WHERE TABLE_SCHEMA="gitlabhq_production" AND TABLE_COLLATION != "utf8mb4_general_ci" AND TABLE_TYPE="BASE TABLE";
# !! If previous query returned results, copy & run all shown SQL statements
# Turn foreign key checks back on
mysql > SET foreign_key_checks = 1;
# You can now quit the database session
mysql> \q

Ensure your GitLab database configuration file uses a proper connection encoding and collation:

1
2
3
4
5
6
# sudo -u git -H editor config/database.yml
production:
adapter: mysql2
encoding: utf8mb4
collation: utf8mb4_general_ci

Restart your GitLab instance

MySQL strings limits

After installation or upgrade, remember to run the add_limits_mysql Rake task

Omnibus GitLab installations

1
sudo gitlab-rake add_limits_mysql

Installations from source

1
bundle exec rake add_limits_mysql RAILS_ENV=production

The text type in MySQL has a different size limit than the text type in PostgreSQL. In MySQL text columns are limited to ~65kB, whereas in PostgreSQL text columns are limited up to ~1GB!

The add_limits_mysql Rake task converts some important text columns in the GitLab database to longtext columns, which can persist values of up to 4GB (sometimes less if the value contains multibyte characters)

7. Redis

GitLab requires at least Redis 2.8.

If you are using Debian 8 or Ubuntu 14.04 and up, then you can simply install Redis 2.8 with:

1
sudo apt-get install redis-server

8. GitLab

1
2
3
4
cd /home/git
# Clone GitLab repository
sudo -u git -H git clone https://gitlab.com/gitlab-org/gitlab-ce.git -b 8-17-stable gitlab

Configure It

1
2
3
4
5
6
7
8
9
10
11
12
13
14
15
16
17
18
19
20
21
22
23
24
25
26
27
28
29
30
31
32
33
34
35
36
37
38
39
40
41
42
43
44
45
46
47
48
49
50
51
52
53
54
55
56
57
58
59
60
61
62
63
64
65
66
67
68
# Go to GitLab installation folder
cd /home/git/gitlab
# Copy the example GitLab config
sudo -u git -H cp config/gitlab.yml.example config/gitlab.yml
# Update GitLab config file, follow the directions at top of file
sudo -u git -H editor config/gitlab.yml
# Copy the example secrets file
sudo -u git -H cp config/secrets.yml.example config/secrets.yml
sudo -u git -H chmod 0600 config/secrets.yml
# Make sure GitLab can write to the log/ and tmp/ directories
sudo chown -R git log/
sudo chown -R git tmp/
sudo chmod -R u+rwX,go-w log/
sudo chmod -R u+rwX tmp/
# Make sure GitLab can write to the tmp/pids/ and tmp/sockets/ directories
sudo chmod -R u+rwX tmp/pids/
sudo chmod -R u+rwX tmp/sockets/
# Create the public/uploads/ directory
sudo -u git -H mkdir public/uploads/
# Make sure only the GitLab user has access to the public/uploads/ directory
# now that files in public/uploads are served by gitlab-workhorse
sudo chmod 0700 public/uploads
# Change the permissions of the directory where CI job traces are stored
sudo chmod -R u+rwX builds/
# Change the permissions of the directory where CI artifacts are stored
sudo chmod -R u+rwX shared/artifacts/
# Change the permissions of the directory where GitLab Pages are stored
sudo chmod -R ug+rwX shared/pages/
# Copy the example Unicorn config
sudo -u git -H cp config/unicorn.rb.example config/unicorn.rb
# Find number of cores
nproc
# Enable cluster mode if you expect to have a high load instance
# Set the number of workers to at least the number of cores
# Ex. change amount of workers to 3 for 2GB RAM server
sudo -u git -H editor config/unicorn.rb
# Copy the example Rack attack config
sudo -u git -H cp config/initializers/rack_attack.rb.example config/initializers/rack_attack.rb
# Configure Git global settings for git user
# 'autocrlf' is needed for the web editor
sudo -u git -H git config --global core.autocrlf input
# Disable 'git gc --auto' because GitLab already runs 'git gc' when needed
sudo -u git -H git config --global gc.auto 0
# Enable packfile bitmaps
sudo -u git -H git config --global repack.writeBitmaps true
# Configure Redis connection settings
sudo -u git -H cp config/resque.yml.example config/resque.yml
# Change the Redis socket path if you are not using the default Debian / Ubuntu configuration
sudo -u git -H editor config/resque.yml

Configure GitLab DB Settings

1
2
3
4
5
6
7
8
9
10
11
12
13
14
15
16
17
# PostgreSQL only:
sudo -u git cp config/database.yml.postgresql config/database.yml
# MySQL only:
sudo -u git cp config/database.yml.mysql config/database.yml
# MySQL and remote PostgreSQL only:
# Update username/password in config/database.yml.
# You only need to adapt the production settings (first part).
# If you followed the database guide then please do as follows:
# Change 'secure password' with the value you have given to $password
# You can keep the double quotes around the password
sudo -u git -H editor config/database.yml
# PostgreSQL and MySQL:
# Make config/database.yml readable to git only
sudo -u git -H chmod o-rwx config/database.yml

Install Gems

1
2
3
4
5
# For PostgreSQL (note, the option says "without ... mysql")
sudo -u git -H bundle install --deployment --without development test mysql aws kerberos
# Or if you use MySQL (note, the option says "without ... postgres")
sudo -u git -H bundle install --deployment --without development test postgres aws kerberos

Install GitLab Shell

1
2
3
4
5
6
# Run the installation task for gitlab-shell (replace `REDIS_URL` if needed):
sudo -u git -H bundle exec rake gitlab:shell:install REDIS_URL=unix:/var/run/redis/redis.sock RAILS_ENV=production SKIP_STORAGE_VALIDATION=true
# By default, the gitlab-shell config is generated from your main GitLab config.
# You can review (and modify) the gitlab-shell config as follows:
sudo -u git -H editor /home/git/gitlab-shell/config.yml

Install gitlab-workhorse

1
sudo -u git -H bundle exec rake "gitlab:workhorse:install[/home/git/gitlab-workhorse]" RAILS_ENV=production

Initialize Database and Activate Advanced Features

1
2
3
4
5
sudo -u git -H bundle exec rake gitlab:setup RAILS_ENV=production
# Type 'yes' to create the database tables.
# When done you see 'Administrator account created:'

You can set the Administrator/root password and e-mail by supplying them in environmental variables, GITLAB_ROOT_PASSWORD and GITLAB_ROOT_EMAIL respectively, as seen below. If you don’t set the password (and it is set to the default one) please wait with exposing GitLab to the public internet until the installation is done and you’ve logged into the server the first time. During the first login you’ll be forced to change the default password.

1
sudo -u git -H bundle exec rake gitlab:setup RAILS_ENV=production GITLAB_ROOT_PASSWORD=yourpassword GITLAB_ROOT_EMAIL=youremail

Install Init Script

Download the init script (will be /etc/init.d/gitlab):

1
sudo cp lib/support/init.d/gitlab /etc/init.d/gitlab

And if you are installing with a non-default folder or user copy and edit the defaults file:

1
sudo cp lib/support/init.d/gitlab.default.example /etc/default/gitlab

If you installed GitLab in another directory or as a user other than the default you should change these settings in /etc/default/gitlab. Do not edit /etc/init.d/gitlab as it will be changed on upgrade.

Make GitLab start on boot:

1
sudo update-rc.d gitlab defaults 21

Setup Logrotate

1
sudo cp lib/support/logrotate/gitlab /etc/logrotate.d/gitlab

Check Application Status

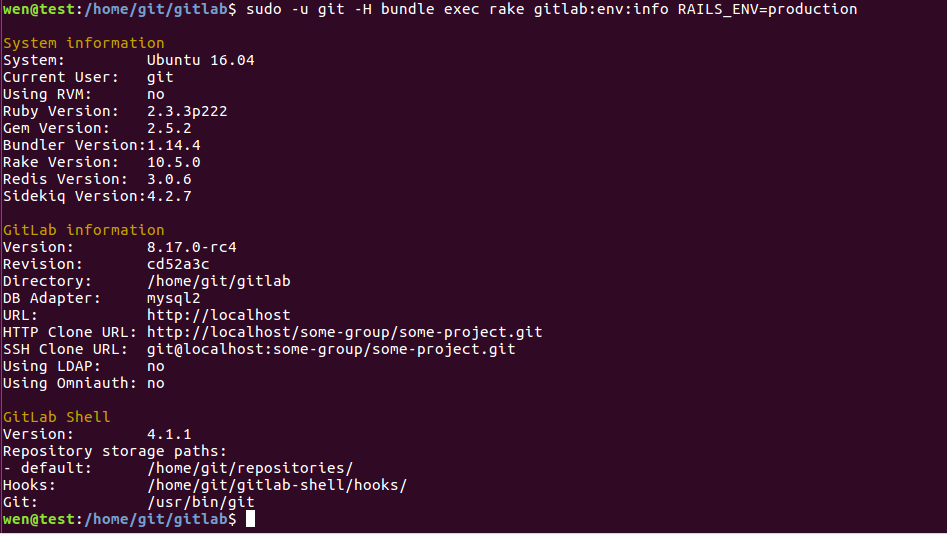
Check if GitLab and its environment are configured correctly:

1
sudo -u git -H bundle exec rake gitlab:env:info RAILS_ENV=production

Compile Assets

1
2
sudo -u git -H yarn install --production --pure-lockfile
sudo -u git -H bundle exec rake gitlab:assets:compile RAILS_ENV=production NODE_ENV=production

Start Your GitLab Instance

1
2
3
sudo service gitlab start
# or
sudo /etc/init.d/gitlab restart

9. Nginx

1
sudo apt-get install nginx

Site Configuration

1
2
sudo cp lib/support/nginx/gitlab /etc/nginx/sites-available/gitlab
sudo ln -s /etc/nginx/sites-available/gitlab /etc/nginx/sites-enabled/gitlab

Double-check Application Status

To make sure you didn’t miss anything run a more thorough check with:
1
sudo -u git -H bundle exec rake gitlab:check RAILS_ENV=production

Alt text

Initial Login

1
sudo service gitlab start/stop/restart

10. Troubleshooting

1
2
3
4
5
6
cc1: warning: unrecognized command line option "-Wno-self-assign" [enabled by default]
cc1: warning: unrecognized command line option "-Wno-constant-logical-operand" [enabled by default]
cc1: warning: unrecognized command line option "-Wno-parentheses-equality" [enabled by default]
cc1: warning: unrecognized command line option "-Wno-tautological-compare" [enabled by default]
Make sure that `gem install json -v '1.8.3'` succeeds before bundling.
  • We do not support Ruby 2.4.0 yet. Please stay tuned! 详细介绍

1
/usr/bin/env: node: No such file or directory
  • Problem is that Ubuntu calls it’s node binary nodejs. Bad move, as this install script is unable to find it.
    Fixed that by setting a temporary alias: alias node=nodejs

1
2
3
4
5
6
7
8
9
10
11
12
13
14
15
16
17
18
19
20
21
22
23
24
25
26
27
28
29
30
31
32
33
34
35
36
37
38
wen@test:/home/git/gitlab$ sudo -u git -H yarn install --production --pure-lockfile
yarn install v0.20.3
info No lockfile found.
[1/4] Resolving packages...
[2/4] Fetching packages...
error webpack-dev-server@2.4.1: The engine "node" is incompatible with this module. Expected version ">=4.7".
error Found incompatible module
info Visit https://yarnpkg.com/en/docs/cli/install for documentation about this command.
wen@test:/home/git/gitlab$ node -v
The program 'node' is currently not installed. You can install it by typing:
sudo apt install nodejs-legacy
wen@test:/home/git/gitlab$ nodejs -v
v4.2.6
wen@test:/home/git/gitlab$ sudo apt-get install nod
Display all 336 possibilities? (y or n)
wen@test:/home/git/gitlab$ sudo apt-get install nodejs
Reading package lists... Done
Building dependency tree
Reading state information... Done
The following package was automatically installed and is no longer required:
libuv1
Use 'sudo apt autoremove' to remove it.
The following packages will be upgraded:
nodejs
1 upgraded, 0 newly installed, 0 to remove and 272 not upgraded.
Need to get 11.0 MB of archives.
After this operation, 41.6 MB of additional disk space will be used.
Get:1 https://deb.nodesource.com/node_7.x xenial/main amd64 nodejs amd64 7.6.0-1nodesource1~xenial1 [11.0 MB]
Fetched 11.0 MB in 34s (325 kB/s)
(Reading database ... 256411 files and directories currently installed.)
Preparing to unpack .../nodejs_7.6.0-1nodesource1~xenial1_amd64.deb ...
Unpacking nodejs (7.6.0-1nodesource1~xenial1) over (4.2.6~dfsg-1ubuntu4.1) ...
Processing triggers for man-db (2.7.5-1) ...
Processing triggers for doc-base (0.10.7) ...
Processing 1 removed doc-base file...
Setting up nodejs (7.6.0-1nodesource1~xenial1) ...
wen@test:/home/git/gitlab$ nodejs -v
v7.6.0

1
2
3
4
5
6
7
8
9
wen@test:/home/git/gitlab$ sudo -u git -H yarn install --production --pure-lockfile
sudo: yarn: command not found
wen@test:/home/git/gitlab$ curl -sS https://dl.yarnpkg.com/debian/pubkey.gpg | sudo apt-key add -
OK
wen@test:/home/git/gitlab$ echo "deb https://dl.yarnpkg.com/debian/ stable main" | sudo tee /etc/apt/sources.list.d/yarn.list
deb https://dl.yarnpkg.com/debian/ stable main
sudo apt-get update && sudo apt-get install yarn

Alt text
Alt text

  • uncomment unixsocket /var/run/redis/redis.sock,unixsocketperm 700,change 700 to 777

Alt text

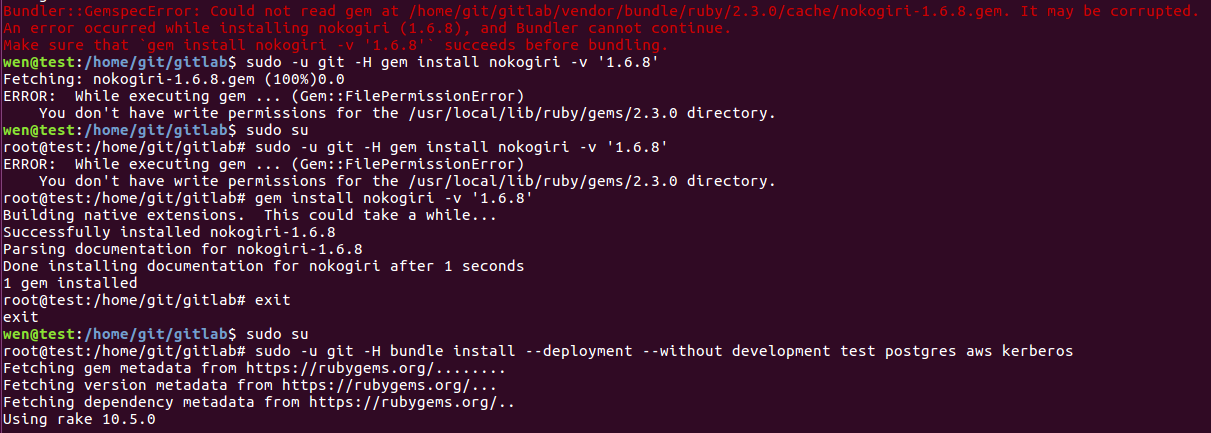
  • bundle install 时会进入rubygems.org找最新的gem目录,而依据官方文档安装之后gemfile.lock里的nokogiri 1.6.8已过时,需要修改gemfile.lock里的nokogiri 1.6.8为最新的nokogiri 1.6.8.1

1
2
ERROR: While executing gem ... (Gem::Exception)
Unable to require openssl, install OpenSSL and rebuild ruby (preferred) or use non-HTTPS sources

Alt text

Alt text

1
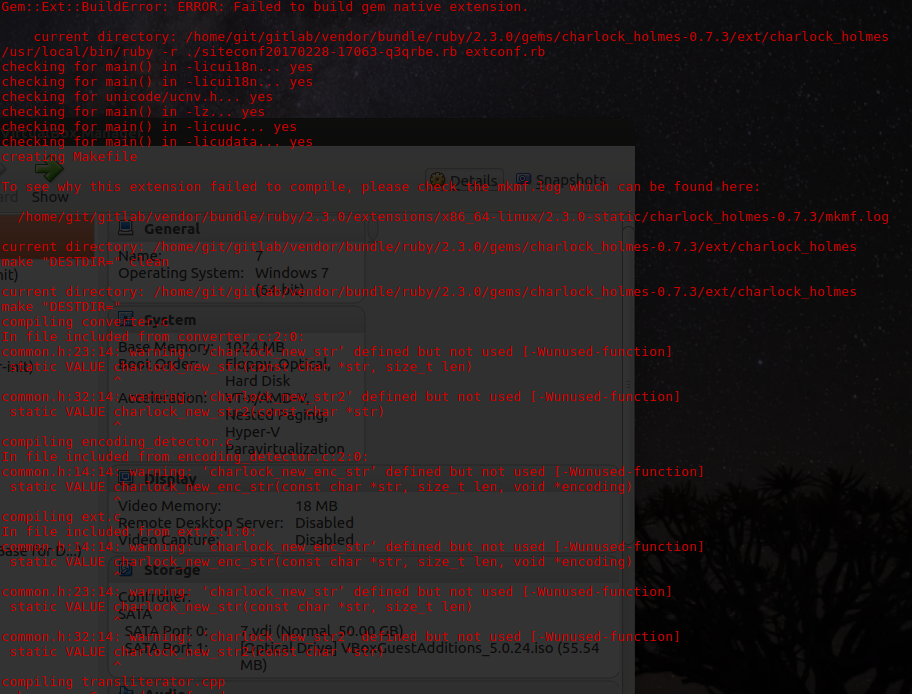
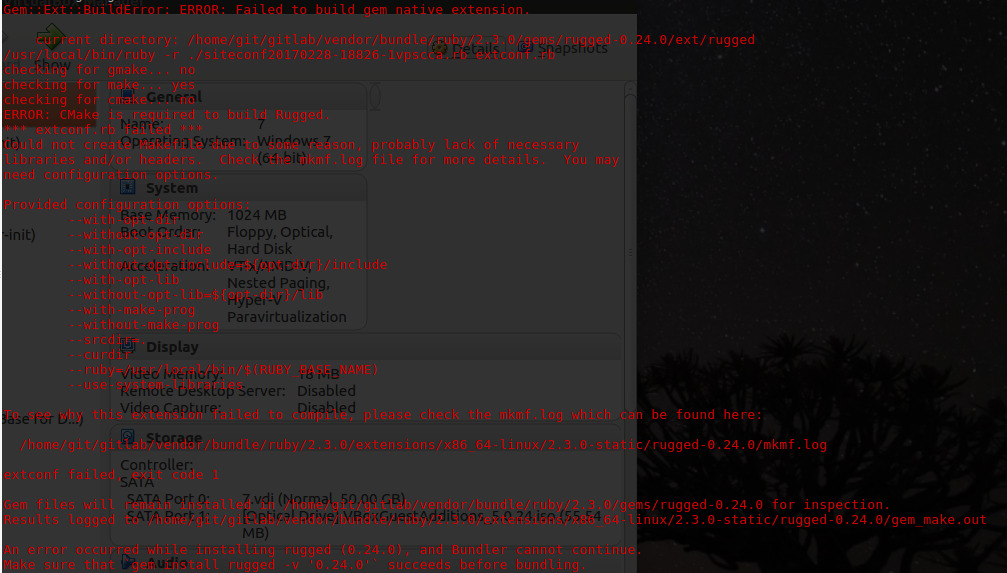
sudo apt-get install libssl-dev libreadline-dev libgdbm-dev cmake g++

1
2
3
4
5
6
root@vmlin5682:/home/git/gitlab# gem install rake --version 10.5.0
Fetching: rake-10.5.0.gem (100%)
ERROR: While executing gem ... (TypeError)
no implicit conversion of nil into String
# gem update --system
  • sudo: bundle: command not found,sudo gem command not found,sudo: yarn: command not found

系统中都已经安装了ruby,bundle,gem,为何在执行sudo -u git -H相关命令的时候,频繁提示command not found

Check if the PATH has the same values both with and without sudo. Apparently it cannot find bundle just because it is not listed in PATH
http://stackoverflow.com/questions/22456998/why-is-sudo-bundle-command-not-found
http://stackoverflow.com/questions/3914694/bundle-command-not-found

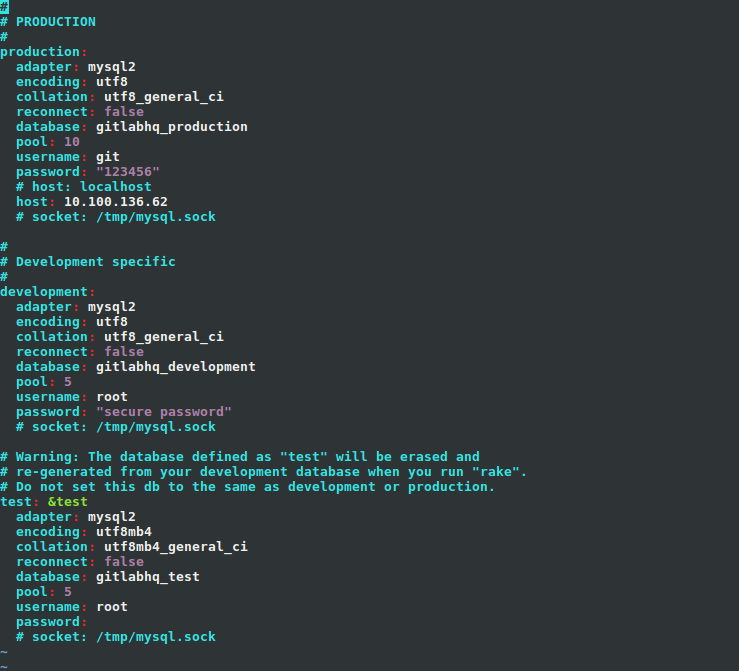
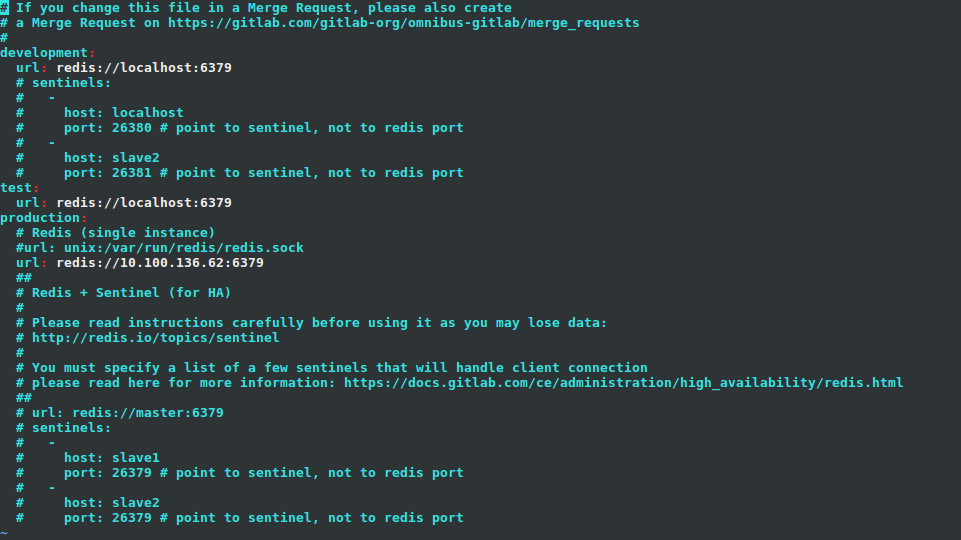
  • MySQL,Redis HA

Alt text
Alt text
Alt text

1
2
3
4
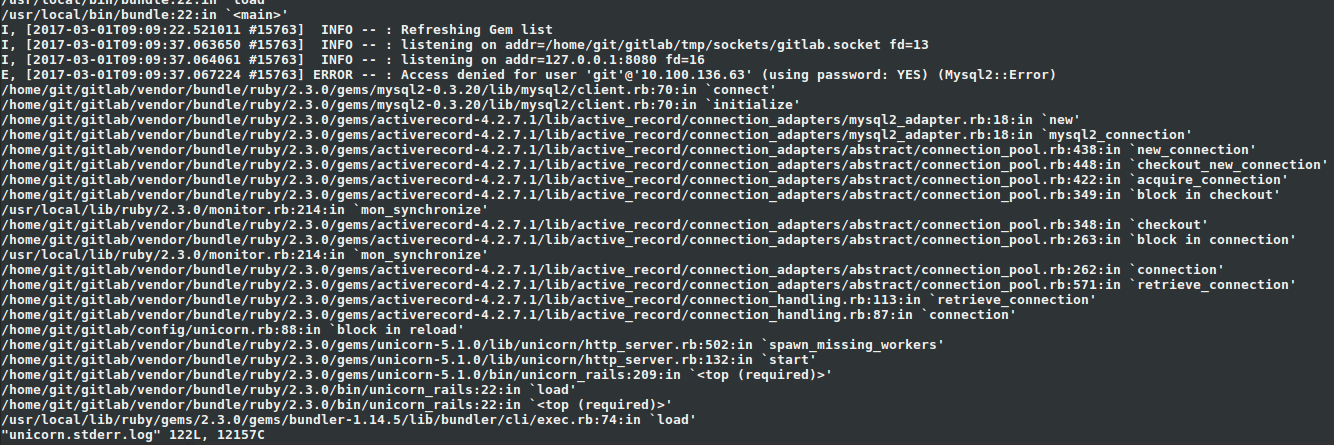
GRANT ALL PRIVILEGES ON *.* TO 'git'@'%' IDENTIFIED BY 'password' WITH GRANT OPTION;
FLUSH PRIVILEGES;
# bind-address = 127.0.0.1(/etc/mysql/my.cnf)